Sprites
Open/Select the Sprites window pressing Command-2. The Sprites window lets you arrange the time-line of your objects in the animation. Each object on the Stage window is here represented by a small colored rectangle, said sprite, which you can organize within a hierarchical structure. You can create an object, e.g. a Cube, selecting the menu item Objects/3D/Cube and see its sprite on the Sprites window. |
|
| Change the duration of the animation | |
| You can click on the End Animation marker in the ruler view and drag it horizontally to vary the duration of the whole animation. Press the Command key during the drag to snap to each 10 frames in the time line. You can also change the duration of the animation entering a value in the field Duration on the Inspector panel. |
|
| Change the start and the end point of a sprite | |
| You can click on the sprite and drag the mouse horizontally to move the sprite along the time and set its start point and end point, without changing its duration. This way you easily synchronize an object with the other objects on the scene establishing the moment your objects have to appear and disappear from the Stage. Press Command during the drag to snap to each 10 frames of the time line. Press Command during the drag and rollover another sprite to align the start sprite to the start sprite of the rolled-over sprite. |
|
| Change the sprite duration (resampling key frames) | |
| You can change the duration of the sprite by simply changing its width on the Sprite view.Roll the mouse over the right (or the left) border of the sprite until you see the Resize cursor then drag the mouse horizontally. You can achieve the same result by holding down the Control key and click/drag on any point of the sprite. As shown on the animation here aside, while resizing a sprite, Kinemac proportionally redistributes (if any) the key frames (see how to create Key Frames on the Animation page). This way you really speed up or slow down the the object's animation. For example, if the sprite was 2 seconds long, and you resize it to 4 seconds, you will get the same movements in 4 seconds. This means that now the object will do the same animation at half a speed. |
|
| Change the sprite duration (not resampling key frames) | |
| If you need to increase the duration of the object on the stage but you don't want to speed up or slow down the animation already defined, you have to modify the duration of the sprite without resampling the existing key frames. To do that you have to hold down the Option key then horizontally drag the sprite left or right borders. You can achieve the same result by holding down the Control+Option key and click/drag on any point of the sprite. On the animation here aside, after resizing the sprite to 200 frames long, since the key frames have not been modified, the animation of the object will remain unchanged from the point 100 to the point 200. Then the object will statically stand on the stage from the frame 200 to the frame 300. You could now add a key frame on the frame 300 and create a new motion between the frame 200 and the frame 300. |
|
| Change the time of a key frame point | |
You can vary the time of a key frame point dragging the key frame icon  to the left or to the right side on the ruler view of the Sprite window. This way you will modify the animation of that sprite. For example, if you move a key frame from the point 110 to the point 60, you move the positions and rotations associated to that key frame to the time point 60. Therefore the animation between the point zero and the point 60 will run faster. to the left or to the right side on the ruler view of the Sprite window. This way you will modify the animation of that sprite. For example, if you move a key frame from the point 110 to the point 60, you move the positions and rotations associated to that key frame to the time point 60. Therefore the animation between the point zero and the point 60 will run faster.
|
|
| Remove a key frame | |
|
On the Sprites window you can remove all the key frames from a given frame simply dragging the key frame icon out of the ruler view holding down the Command key. You can also remove the key frame on the Inspector panel.
|
|
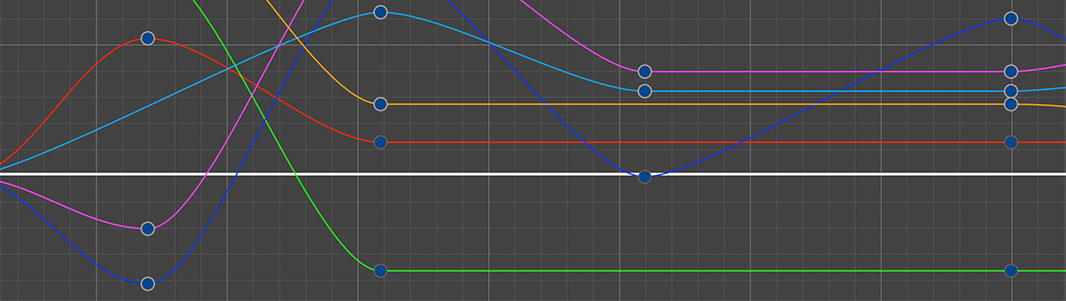
| Managing key frames and Bezier curves | |
| You can double click on a sprite to open the Bezier window. Or you can click on a sprite, or on an object on the Stage window, and open the Bezier window selecting the menu item Window:Bezier. On the Bezier Window you can edit the key frames and the curves describing any movement of the object. See the Bezier window page to know more. |
|
| Insert Frames | |
| You can insert frames in a given point of a sprite using the mouse. Just hold down the Option key while rolling over a sprite and you will be shown a pop-window reporting the insertion point, current start sprite, end sprite and duration. Move the mouse until you reach the exact insertion point. Then click and drag the mouse to the RIGHT direction until you reach the exact amount of frames inserted (see the value Frames Inserted: 100 on the pop-up window). Hold down the Command key to snap to 10 frames inserted. Release the mouse. You will notice that the key frames at the right of the insertion point have been translated to the right while the key frames at the left of the insertion point have been left untouched. The duration of the sprite will be increased by the amount of the frames inserted. If you add frames to a sprite folder, Kinemac will automatically add frames to all the sprites nested in that sprite folder. If you don't want to add frames to the nested sprites, hold down the Option+Shift keys before clicking and dragging the mouse. |
|
| Delete Frames | |
| You can delete frames from a given point of a sprite using the mouse. Just hold down the Option key while rolling over a sprite and you will be shown a pop-window reporting the insertion point, current start sprite, end sprite and duration. Move the mouse until you reach the exact insertion point. Then click and drag the mouse to the LEFT direction until you reach the exact amount of frames deleted (see the value Frames Inserted: -50 on the pop-up window). Hold down the Command key to snap to 10 frames deleted. Release the mouse. You will notice that the key frames at the right of the insertion point have been translated to the left while the key frames at the left of the insertion point have been left untouched. If a key frame falls in the red zone (frames deleted) Kinemac will remove that. The duration of the sprite will be decreased by the amount of the frames deleted. If you delete frames from a sprite folder, Kinemac will automatically delete frames from all the sprites nested in that sprite folder. If you don't want to delete frames from the nested sprites, hold down the Option+Shift keys before clicking and dragging the mouse. |
|
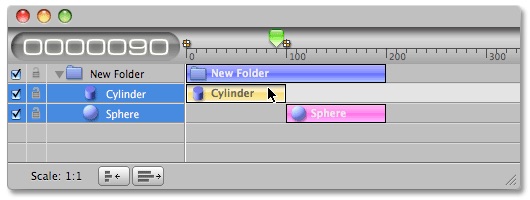
| Sprite Alignment with Snap | |
| On the picture here aside we are horizontally dragging the sprite Tube. While dragging, the user will be shown 2 red vertical red lines at the start and at the end of the sprite to allow the alignment with the utmost accuracy. Furthermore, holding down the Command key and rolling over another sprite (e.g. the Tube), the dragged sprite Cylinder will be aligned to the beginning of the rolled over sprite. The alignment occurs in case the user drags the whole sprite and in case he extends the duration of the sprite dragging the left or the right border of the sprite. If no sprite is rolled over during the drag when holding down the Command key, the dragged sprite will snap to each 10 ticks of the sprite line. |
|
| Multiple Selection | |
| You can select several sprites per time, then translate, rotate, change hierarchy, set key-frames, align, duplicate, assign textures, colors... and delete the selected sprites in one shot only. To extend the current selection on the Stage Window, hold down the Shift key and select the next object. On the Sprite window, hold down the Shift key and click on a sprite to extend the selection until the last sprite clicked. Hold down the Control key and click on a Sprite to add that sprite to the selection. To deselect, press the Escape key or, on the Stage window, click on an empty zone. |
|
| Change the sprites hierarchy (sprite Group) | |
| In the hierarchical list on the left side of the Sprite window you can move the sprites vertically such a way to rearrange the hierarchy of the objects and their drawing priority. The top most sprites will be drawn as first. This could help you to establish a drawing priority in case of transparent objects. It's always better to place the transparent objects at the bottom of the list such a way their transparency could be calculated onto the objects already drawn on the Stage. Furthermore, you will change the hierarchy of the sprites to arrange your objects within groups and sub groups. For example you can create a group containing several objects, then just moving the sprite group (e.g. rotating the group on the Stage window) you will be simultaneously moving all the objects nested therein with the minimum effort. To change the hierarchy of a sprite simply drag a sprite on the hierarchical table view as you are used to do with the files in the Finder folder-windows. When the objects are part of a group you can assign independent movements to each single object and to its group. So for example you can create a group called Hand containing 5 objects: the fingers. So when you move the group you move all the fingers. And more, you can rotate individually each sprite Finger. When an object is nested within a group you can select it on the Stage window clicking on it holding down the Option key. Kinemac will automatically open all the group items in the hierarchy to show you the selected item in the hierarchical list. If you don't hold down the Option key you will select its whole group. To open a group folder in the hierarchical Sprites list, click on the black triangle icon. If you click on the triangle holding down the Option key you will open all the groups nested within the group you have just opened. Likewise, if you close a group holding down the Option key you will close all the groups nested within the group you have just closed. When resizing a group, Kinemac automatically will resize the key frames of the sprite group and the key frames of all the sprites nested within the sprite group. As written above, hold down the Option key to don't resample the key frames when resizing the sprite group. And, if you don't want to transfer your action to the objects nested within a group when moving or resizing a sprite group, hold down the Shift key while moving or resizing the sprite group. |
|
|
Creating Key Frames The easiest way to create key frames is on the Inspector panel or pressing the Command-K keys. However you could find useful too creating key frames using the menu item Animation:Set Key Frame. That menu item lets you create key frames from scratch (e.g. setting the key frame as the current positions and rotations) or copying the values from the previous or next key frame. For example, if you select the menu item As Previous : All Positions and Rotations you will quickly create a new key frame copying all the values from the previous key frame. Therefore, between the previous and the current key frame there will be no animation. Usually, after creating a new key frame as the previous one, you will be moving the object to a new position and build your animation in a progressive way. You can also copy a key frame by selecting the menu item Sprite:Copy Frame Values (or pressing Command-Option-C) and paste a key frame by selecting the menu item Sprite:Paste Frame Values (or pressing Command-Option-V). |
|
|
Copy/Paste Sprite Values A powerful command that you will find very useful is the menu item Sprite:Copy Sprite Values. Just select a sprite and select this menu item, then select another sprite and select the menu item Sprite:Paste Sprites Values. The second sprite will get the sprite values you want from the first sprite (e.g. start point, end point, duration and all the key frames with the bezier curves), thus it could animate exactly like the first sprite. With this command you can easily transfer an animation to other objects on the Stage. Then, e.g. you can translate the second object and get this way two objects moving the same way in duet. |
|
|
Copy/Paste Frame Values With the command Sprite:Copy Frame Values (or pressing Command-Option-C) you can copy all the frame values and paste them later to a different frame on the same sprite or on a different sprite using the menu item Sprite:Paste Frame Values (or pressing Command-Option-V). It's very useful when you want to set a frame with the same values and key frames from a different frame and/or a different sprite. |
|
|
Modify the animation You can modify the animation changing the positions and rotations of an object on a given key frame. Firstly you have to place the time marker onto that key frame on the time line, then on the Stage window move and rotate your object to the new position. You can also vary the positions and rotations of the object changing the values of the fields/wheels/steppers on the Inspector panel. See how to create an animation.  Please note that you have to BE SURE that the time marker is really placed on a key frame point when you modify the positions and the rotations of the object on that key frame point. Instead of manually placing the time marker on a key frame point, we always suggest to "jump" from a key frame to the next key frame pressing the TAB key. Press SHIFT-TAB to go to the previous key frame. If you modify the position or the rotation of the object when the time marker is not placed on a key frame you will be modifying its position and rotation along the whole duration of the sprite (open the Bezier window to see how it works). Please note that you have to BE SURE that the time marker is really placed on a key frame point when you modify the positions and the rotations of the object on that key frame point. Instead of manually placing the time marker on a key frame point, we always suggest to "jump" from a key frame to the next key frame pressing the TAB key. Press SHIFT-TAB to go to the previous key frame. If you modify the position or the rotation of the object when the time marker is not placed on a key frame you will be modifying its position and rotation along the whole duration of the sprite (open the Bezier window to see how it works).
|
|
|
Save a sprite object to a file Drag a sprite from the hierarchical sprite list onto the Finder to create a SpriteName.kmcobj file containing that sprite. Later you can drag this file onto the Stage window or onto the hierarchical Sprites list to import that sprite in a different project (together with its animation, size, color, texture mapping...). You can use these files to build you own library of objects that you can later reuse and/or share with other Kinemac users. Please note that, as default, the file kmcobj contains only a path reference to the image and movie textures applied to that sprite. So, if you move this file to a different computer, you will lose the textures applied to the sprite. In order to save the image and movie textures applied to the sprite within the file itself SpriteName.kmcobj, simply drag the sprite onto the Finder holding down the Option key. This way you can give this file to a Kinemac user located everywhere, and when he will drag this file onto the Stage window he will get the original sprite together with all the original textures. We ask the user to press the Option key to save the textures associated with the sprite because a sprite could even contain an High Definition texture movie (e.g. 1GB). |
|